
UPDATED: The chart for “ISO vs Effective Dynamic Range” has been updated to more accurately reflect the behavior of the RED Weapon Helium. Previously, the chart showed a linear curve of how many stops below or above neutral grey the sensor could capture. The chart now indicates a non-linear curve to more realistically portray the behavior of dynamic range in relation to neutral grey.
Ever worked on a video or photo shoot in a mixture of low light and bright light situations and wondered, how the heck is this going to work?! Let’s take a look at two important factors that go into capturing images that involve either a lot of highlights (bright areas), shadows (dark areas), or a combination of both. We’ll be discussing ISO, stops, and dynamic range a lot in this post so here’s a quick definition of all three:
ISO is a measurement of how sensitive your camera is to light. The higher your ISO value, the more sensitive it is, while the lower the ISO number, the less sensitive it is.
Dynamic Range refers to the range of light that a camera can successfully capture without losing any detail. A higher dynamic range (i.e. 16 stops of dynamic range) the more highlights and shadows can be captured in a single frame.

Sigma Cine Zoom 18-35 T2.0 Lens indicating an exposure of T4.0.
A stop of light is simply doubling or halving the amount of light being captured in either photography or video. In the picture to the right, increasing by 1 stop would double the light passing through the lens (+1 stop, T4 to T2.8), while decreasing by 1 stop would halve the light passing through the lens (-1 stop. T4 to T5.6).
The settings in your camera can affect your dynamic range so ensuring these are set properly is key. Right off the bat, you may be asking “but if a camera says it has xx of dynamic range, shouldn’t it always have that much?”. For example, if we look at a post from RED about dynamic range, they describe the behavior as such:
At high ISO, sensors with analog gain typically lose one stop of dynamic range for each stop increase in ISO.
So, in layman’s terms, what does that mean? Essentially, any camera you record video with that does not have RAW capability will lose Dynamic Range in either direction if you stray away from the native ISO. Shooting RAW has many benefits and, in my opinion, this is the most important one. Shooting RAW allows the sensor’s dynamic range to be preserved, but not in a way that you may think.
Recently, I’ve been shooting a lot with REDs of all varieties (Helium, Gemini, and Scarlet-W) and having a deeper understanding of ISO and how it directly impacts dynamic range has been instrumental. Let’s take a look at how RED explains ISO in relation to RAW capture:
With RED, the original signal remains unamplified before being saved as a RAW file. The idea is to record as much as possible from the sensor, and to maximize flexibility for adjusting exposure in post production. As a result, the full dynamic range is captured regardless of ISO choice, and ISO can be specified after the exposure. ISO only affects how the RAW data is interpreted.
There is a sentence in their explanation that is so critical, and I feel a lot of people miss this concept or just don’t bother to understand it! Here’s where we must pay very close attention:
ISO only affects how the RAW data is interpreted.
The simple explanation here is that you can’t just adjust ISO to your liking on set and expect to have the total dynamic range (16 stops in the case of the RED Weapon Helium) spread evenly across your picture. What RED is explaining here is that your 16 stops of dynamic range remain intact no matter your ISO, but where that dynamic range falls depends on your ISO choice. We’ve made a chart to illustrate this point so take a look below.
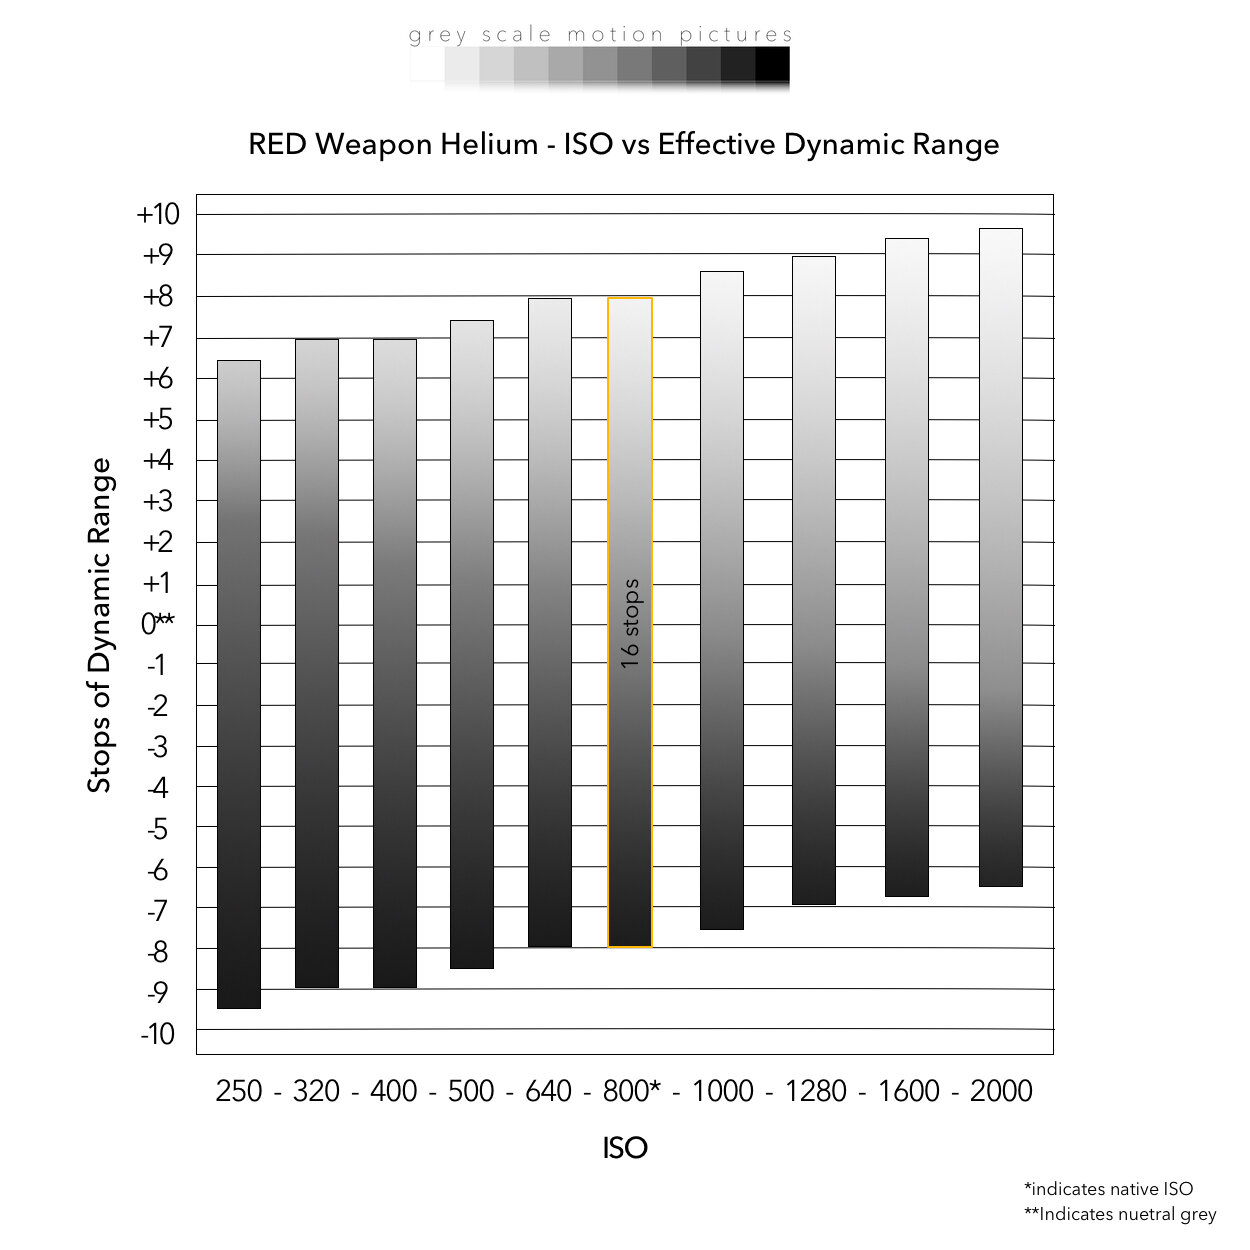
As you can see, and this may sound completely backwards, if you want to protect your highlights (i.e. have greater highlight detail) it is actually better to choose a higher ISO. The reverse is also true, to protect shadows, select a lower ISO. RED again gives a great explanation of how this relates to your highlights, middle grey, and shadows.
Since the total dynamic range remains unchanged, this effectively shifts the number of stops that fall above and below middle gray, and compresses or expands tones accordingly. At low ISO speeds, most of the dynamic range is below middle gray, whereas at high ISO speeds most of this dynamic range lies above middle gray.
In practice, this can be hard to do on set, as it goes against every natural instinct. I recently shot with a Scarlet-W, using only natural light in a CrossFit gym. As we talked about how to preserve some of the highlights coming in from the windows and not worry too much about shadows, as there weren’t many, we decided to raise our ISO to 1280 or 1600 depending on the shot. Sometimes this means adding ND so you aren’t clipping your highlights, but a higher ISO will give you a lot more latitude in post with your highlights!
I hope all of this helps you on set next time, and just remember, even though it feels completely unnatural, you have science and research backing you up. Trust me, your editor and colorist will thank you!